
Course Information
Hole # 1
Hole #1 is an interesting starting hole as your straight away view of the fairway is blind. With this hole only being 340 yards, it allows the golfer to ease into their round without too much difficulty. It has a fairway bunker on the left hand side that is approximately 50 yards short of the green and is 240 yards off the tee. Miss that bunker and you should have a relatively simple approach to the green.
|
Black 348 |
Blue 338 |
White 338 |
Green 331 |
|
Stroke (M/L) 15/9 Par 4 |
|||
Hole # 2
Hole #2 is a very challenging 385 yard par 4 that dogleg’s lefts off the tee. To start your tee shot you must favor the right-hand side in order to miss the stack of 3 bunkers protecting the left-hand side of the hole. Stronger players can possibly carry the bunkers on the left making this hole shorter. Once you have placed your tee shot near the corner, you now have a down grade shot into the green that works from front to back. Experienced golfers will land short of the green and let their shot release on to the putting surface.
|
Black 413 |
Blue 384 |
White 329 |
Green 329 |
|
Stroke (M/L) 7/11 Par 4 |
|||
Hole # 3
Hole #3 is a nearly 500 yard par 5 that will challenge golfers of any ability. While most will play this as a 3 shot hole, a few aggressive golfers will take a chance to get there in 2. There are two fairway bunkers on the left-hand side of the fairway. These bunkers are 200 yards off the tee and 240 to carry. Once in safe position you have a decent landing area around 100 yards away from the green. Miss left or right, you will be faced with 6 fairway and greenside bunkers as you approach the green.
|
Black 506 |
Blue 490 |
White 428 |
Green 428 |
|
Stroke (M/L) 3/1 Par 5 |
|||
Hole # 4
Here we hit our first par 3 of the round with a yardage of 180 yards. This massive green complex is surrounded by 3 large bunkers. Getting on the green is goal number one, but once on the putting surface, the real challenge begins. The putting surface has many undulations that will challenge the best putter.
|
Black 198 |
Blue 177 |
White 162 |
Green 145 |
|
Stroke (M/L) 17/17 Par 3 |
|||
Hole # 5
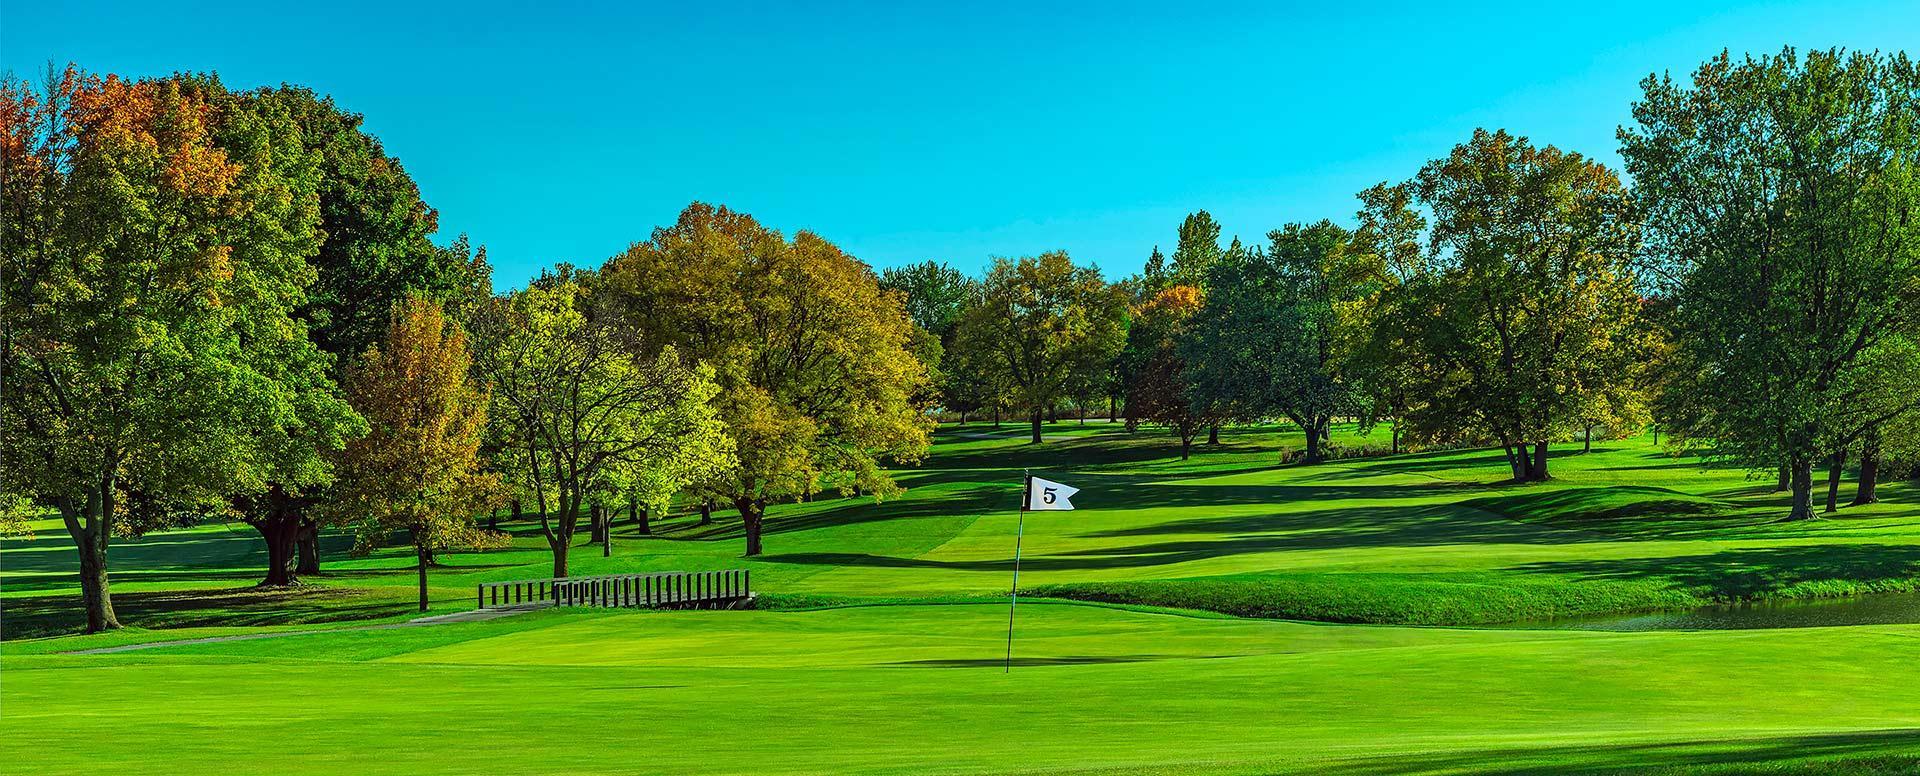
Another Par 5 here totaling 500 yards with two fairway bunkers of the tee to keep you in check. They are staggered bunkers with one on the left and right-hand side of the fairway. Even if you find the fairway, you will find yourself with a downhill lie and 170 yard shot over water. Most players will lay up short of the water leaving an around 125 yard shot to the green. The aggressive player will try to go for the green in two, but be sure to hit that 2nd shot high enough, or the water will gobble up that 2nd shot.
|
Black 519 |
Blue 497 |
White 467 |
Green 426 |
|
Stroke (M/L) 1/3 Par 5 |
|||
Hole # 6
Hole #6 is a stout Par 4 that is over 400 yards with an uphill approach to the green. This hole has no fairway bunkers, but will challenge you every step of the way. Miss the fairway and you will have to deal with deep rough and trees blocking your shot. Most will have a 180 yard shot into this uphill green that has 3 bunkers stacked on the right-hand side. This green complex is tilted heavily from back to front, staying short of the pin will leave you with the best chance to score.
|
Black 442 |
Blue 414 |
White 337 |
Green 337 |
|
Stroke (M/L) 5/7 Par 4 |
|||
Hole # 7
Great view from the tee box of here that keeps you thinking the entire length of this 400 yard hole. Players must keep their tee shot left of the 3 cluster bunkers on the right-hand side of the fairway. Players that find one of these bunkers, will be left with a 160 yard shot over water that protects the right half of the green. Large amount of undulation on this green and surrounds with no green side bunkers.
|
Black 439 |
Blue 400 |
White 374 |
Green 297 |
|
Stroke (M/L) 5/7 Par 4 |
|||
Hole # 8
As you approach hole #8 a par 3, you will notice a forced carry over water to a rather large green which sits 150 yards away. This green is also protected by 4 green side bunkers. Once on the putting surface you will find 4 quadrants that all break away from the center of the green. Missing the left on this hole is the safer play, but it will most like make for a tough up & down.
|
Black 173 |
Blue 151 |
White 137 |
Green 114 |
|
Stroke (M/L) 13/15 Par 3 |
|||
Hole # 9
Hole # 9 is a 350 yard hole that works substantially uphill towards the club house. It’s a great view with 3 stacked bunkers protecting the left side of the hole, making players hug the right side of the fairway. The approach shot to this green is somewhat hidden by the severity of the slope leading up to the green. Knowing your exact yardage to this putting surface will be critical as most approach shots release. Once on the green, the challenge begins with one of the most severely sloped greens on the course.
|
Black 368 |
Blue 347 |
White 347 |
Green 289 |
|
Stroke (M/L) 9/5 Par 4 |
|||
Hole # 10
At first the 355 yard 10th hole seems fairly straight forward with not a bunker in sight. The landing area is narrow and players must find the fairway if they have any chance of advancing the ball near the green. Water runs in front of this green about 20 yards short of the putting surface. This perched green has severe false front that catches many players and leaves them with a delicate shot up to the green off a tight lie. This green also has 4 quadrants that all work away from the center of the green. Make sure you find the correct quadrant or you will be very susceptible to a 3-putt
|
Black 389 |
Blue 354 |
White 316 |
Green 316 |
|
Stroke (M/L) 12/12 Par 4 |
|||
Hole # 11
Another par 3 here with a forced carry over water. While this hole is only 140 yards, finding the green is key. Bunkers protect shots that come up short and miss the right-side. This putting surface has a low point in the center of the green, which most shots funnel towards. This hole produces the most Hole-in-Ones each year.
|
Black 346 |
Blue 137 |
White 131 |
Green 110 |
|
Handicap (M/L) 18/14 Par 3 |
|||
Hole # 12
This 390 yard dogleg right hole is protected by 3 stacked bunkers on the right hand side. Most players hug the left side of the fairway as the bunker will prohibit you from reaching the green. This approach shot is uphill to this perched putting surface. Again, having exact yardage and planning for a little release on that shot will help you greatly. The green is protected by 2 green side bunkers.
|
Black 400 |
Blue 391 |
White 378 |
Green 333 |
|
Stroke (M/L) 10/4 Par 4 |
|||
Hole # 13
The 370 yard par 4 13th is probably the toughest driving hole on the course. There is water running along the entire right hand side of the fairway and perfectly placed fairway bunker on the left-hand side. Go too far left and will risk find another pond that will catch your errant shot. Assuming you found the fairway here you will be left with an uphill approach to a putting surface that runs from left to right that is protected by a steep green side bunker. Par is a great score here.
|
Black 378 |
Blue 369 |
White 357 |
Green 299 |
|
Stroke (M/L) 4/18 Par 4 |
|||
Hole # 14
Another challenging tee shot here on the 14th that measures 375 yards. The same body of water on previous hole comes into play as it also protects the right side of the hole. The farther you hit your tee shot, the narrower the landing area as the left side sloping rough pinches in towards the right-hand side water. Another uphill approach here that is protected by deep green side bunkers. This is a 2 teared putting surface that runs back to front.
|
Black 406 |
Blue 373 |
White 325 |
Green 325 |
|
Stroke (M/L) 2/2 Par 4 |
|||
Hole # 15
The longest par 5 on the course and maybe in Milwaukee county as it tips out just over 600 yards. Players must find the fairway here in order to clear the rather severe hill that sits around 230 yards out from the green. Once over this hill, players will have a clean look to this green. Players trying to hit this green in 2-shots, almost always come up short.
|
Black 607 |
Blue 596 |
White 511 |
Green 458 |
|
Stroke (M/L) 6/6 Par 5 |
|||
Hole # 16
At first players are enamored by the beauty of this 170 yard par 3 with a forced carry over water. 5 perched tee boxes sitting level with putting surface, give you a many different looks at this green. The green is protected by 3 stingy bunkers with a putting surface that is extremely severe. Come up short and the green will send you ball well off the front into some of the deepest rough on the course. Make par here and you have made a great score.
|
Black 192 |
Blue 173 |
White 160 |
Green 141 |
|
Stroke (M/L) 16/10 Par 3 |
|||
Hole # 17
Hole 17 has an elevated tee box that works down to this dogleg left par 4. This hole is 340 yards with a carry over water. This green is also perched up and the front of the green is protected by a steep bunker. This bunker also blocks your full view of the green, so know your yardage and pin location is key to getting close to this pin.
|
Black 374 |
Blue 338 |
White 273 |
Green 225 |
|
Stroke (M/L) 16/10 Par 4 |
|||
Hole # 18
This nearly 500 yard finishing par 5 will test players of all ability. The tee shot has a nearly 200 yard carry over water. The rest of the hole work back uphill towards the club house and is protected by bunkers on the left and right-hand side of the fairway. This green is also perched up and protected by bunkers on 3 sides. Nearly impossible to keep a 2nd shot on this green, so most players make it a 3 shot hole. We all want to birdie par 5’s, but be happy with 5 and head to the Turn to celebrate your round.
|
Black 504 |
Blue 492 |
White 447 |
Green 363 |
|
Stroke (M/L) 8/8 Par 5 |
|||
